Feature Ad (728)

Latest In

Friday, 3 October 2014

Microsoft Unveils New Operating System, Dubbed Windows 10


Microsoft has unveiled its initial work on the next version of the Windows operating system, calling it Windows 10.
Revealed during a press event in downtown San Francisco, the new OS is designed to run across a wide range of machines, including everything from tiny “internet of things” devices in business offices to phones, tablets, laptops, and desktops to computer servers running in the massive data centers that underpin the world’s internet services. “Windows 10 will deliver the right experience at the right time on the right device,” said Microsoft operating systems chief Terry Myerson.
The OS will be available to consumers, but it was designed, in particular, for use by the world’s businesses. According to Myerson, businesses will be able to manage all their Windows 10 machines by way of a single central piece of software, and they will have the option of creating their own “app store” for use by employees across these devices.
In demonstrating an early incarnation of the new OS, Joe Belfiore, corporate vice president of Microsoft’s operating systems group, began by showing off the new Windows Start Menu that allows users to navigate applications and data on the OS. The previous version of the OS, Windows 8, moved away from the familiar Windows Start Menu, and this, according to many pundits, hurt the progress of the operating system. As demonstrated by Belfiore, the new Start Menu combines the look and feel of Windows 8—which introduced a colorful “tile” interface—with the more traditional Start Menu offered by its predecessor, Windows 7 (see images above).
Judging from initial comments from Myerson and Belfiore, Windows 10 is in many ways a response to Microsoft’s struggles with Windows 8, introduced two years ago. According to David Johnson, an analyst with Massachusetts-based research outfit Forrester Research, businesses have been slow to adopt Windows 8 because its interface—meant to serve both mouse-and-keyboard machines as well as touchscreen devices—was difficult to use, but also because upgrading to a new Windows OS is still not as easy as it should be.
Belfiore said that Microsoft is “not giving up” on touch devices. The aim is to provide an interface that suits both mouse-and-keyboard devices and touch screens. But as Windows 8 showed, this is a difficult thing to pull off. Apple, by contrast, continues to handle desktops and touchscreen devices with separate OSes. At one point, Belfiore demonstrated code that would allow devices to automatically switch between a mouse-and-keyboard interface and a touchscreen interface, depending on what hardware is attached to the machine.
Tomorrow, Microsoft will release a “technical preview” of the OS to a select group of users and testers. The final version of the OS is expected to arrive in the middle of next year, and Microsoft has indicated it will continually release updates to the new OS after it first ships.
Before revealing the name of the new Windows, Myerson gently teased the room full of reporters, who have closely followed all the online speculation about what the OS would be called. At first, he seemed to indicate it would be called Windows 9, the natural successor to Windows 8. Then he insinuated it would be called Windows One, a nod to Microsoft’s Xbox One gaming console and an apparent attempt to highlight that the OS will run on a wide range of devices. But then he revealed the Windows 10 name, an apparent effort to show that the new OS wants to take a particularly large step forward.

top phones best for selfie around

Selfies have been a popular form of narcissism since the first caveman drew a self-portrait on a cave wall using a mixture of dinosaur blood and mud, but only recently has humanity finally elevated the selfie to an art form.
And like any art form, selfies require the right tools - you can't paint without dinosaur blood, after all.
Luckily device makers are finally starting to cotton on to the fact that the selfie is the most important form of self-expression available to the modern phone-using public.
That's where these devices come in. They may have gorgeous screens and decent specs, or they may not. What's important is that they take better selfies than your friends' phones, and they have it down pat.

Huawei Ascend P7

Chinese firm Huawei knows exactly what the selfie crowd needs: more megapixels!
Appropriately the Huawei Ascend P7 packs an 8MPl snapper onto its face so you can see every pore and wrinkle on its 1080p screen as you make faces that resemble various animals.
Huawei Ascent P7
The Ascend P7 is all about the megapixels
Huawei's latest flagship has decent specs in addition to that lovely camera, though importing it might be more trouble than it's worth when there are plenty of others with equally strong claims to the "king of the selfie" mantle.
Still, if more megapixels is all you're after, the Ascend 7 is the way to go.

Samsung Galaxy Grand Prime

The recently announced Samsung Galaxy Grand Prime stands out for being a mid-range phone currently scheduled to launch only in India, but the truly selfie-obsessed might consider importing it.
Its 5MP front camera is impressive when compared with other phones in its class, but it's not just the megapixels that will ensure your selfies wow friends and loved ones.
Samsung Galaxy Grand Prime
No, what's more important is the Grand Prime's front camera's wide-angle lens, which will ensure you're able to get all your friends - or cats, whatever floats your boat - in the shot with you.

Nokia Lumia 735

In TechRadar's review of the Nokia Lumia 735 we called the colorful Microsoft phone a "cheap and cheerful handset."
But more importantly, we also called it the savior of the selfie.
Nokie Lumia 735
The Lumia Selfie app is where it's at
The Nokia 735 and its sister phone, the Nokia 730, sport a 5MP front camera, which admittedly isn't quite as impressive as the Ascend P7's 8MP shutter.
But more importantly these Windows Phones also come with an exclusive Lumia Selfie app that provides various extremely crucial effects (sepia!) and lets you take selfies with the more powerful rear camera thanks to a handy beeping countdown timer.

Sony Xperia C3

The Sony Xperia C3 shares the 5MP found on many of these phones' front cameras, but also comes with some extras that any self-respecting selfie-obsessor absolutely freaking needs.
Namely, the Xperia C3's front camera packs a "PROselfie" sensor with a soft LED flash that should perfectly illuminate your undoubtedly beautiful mug.
Sony Xperia C3
The Xperia C3: your ticket to laser eyes
It also comes with a "Superior Auto" mode and some fun augmented effects, like laser eyes. Who doesn't want laser eyes?

Samsung Galaxy Note 4

If you pay attention to the phone market then you've no doubt heard a lot about the Samsung Galaxy Note 4, but have you heard that it's a superior selfie-taker in addition to being a viciously spec'd phablet?
The Note 4's selfie appeal is twofold: firstly and foremost, it lets you tap on the rear-mounted heart rate sensor to take a photo with the front camera, rather than requiring you twist your thumb around to the front button.
Samsung Galaxy Note 4
Take it all in
Considering the Note 4's sheer size, this makes obsessively photographing your own face much easier than it might otherwise have been.
But perhaps even more interesting is the Note 4's selfie panorama capability, a unique feature as far as we can tell.
The enormous Samsung phone lets you stitch together multiple portrait-oriented photos take with the front camera into one super-wide, oddly tall selfie. Now if that's not a phone-selling feature then we apparently don't know what is.

HTC RECamera

OK, we're cheating a bit with this one, and in more ways than one.
First is the fact that the HTC RECamera hasn't even been properly announced yet, only teased in a brief video.
HTC RECamera
Now that is a perfect selfie device if we've seen one
Then there's the fact that it's not even a phone or a still camera.
But it's hard to ignore that this GoPro-like camera appears to be shaped exactly like a tiny periscope - and one that could hypothetically be quite easily pointed directly at one's face.
Coincidence? We think not.

Microsoft Universal Mobile Keyboard Is Great for iPads, Androids and Windows

What goes around, comes around. We put aside our laptops in favor of tablets because they’re super-light, but still powerful. Developers recognized the power and mobile devices’ omnipresence in our lives and began to alter mobile platforms and apps to make them better productivity tools.
But the more work you do on a tablet, the more you crave a real keyboard. You could simply go back to you laptop, but that defeats the purpose, doesn’t it? Third-party keyboards, like Microsoft’s new Universal Mobile Keyboard, are the obvious answer.
Microsoft’s $79.95 keyboard is portable, battery-powered and Bluetooth-ready. It also pulls off the neat trick of effortlessly connecting to Windows devices (obviously), iPads, iPhones and Android devices. In a multi-platform environment like mine (I work on a Microsoft Surface Pro 3, but also travel with an iPad), this is a very welcome feature.

The look

The universal keyboard arrives in a clamshell-style case; the rubberized top connects magnetically to the keyboard and also serves as a stand for your tablet or smartphone of choice (up to 0.39 inch thick). If you want more distance between the keyboard and your mobile device, you simply pull the case apart.
At, by my estimation, roughly 80% the size of a full-scale keyboard, some keys on the Universal Mobile Keyboard have been moved or combined. For example, Backspace is in the traditional upper right corner, but it shares the space with Delete, which you access by holding down the Function Key. Once you know this trick it’s pretty easy to use.
Overall, the keyboard is 9.53 inches long by 4.29 inches wide and 0.47 inches tall. It weighs 12.9 ounces. For comparison, an iPad weighs 16.5 ounces. And without the rubber cover, the keyboard is about as thick as an iPad Air.
I tested the keyboard with an iPad Air, a Surface Pro 3, a Sony Xperia Z2 tablet and an iPhone 6. All fit in the stand channel, though the Xperia, which is thinner than an iPad Air, tipped way back. As for the Surface Pro 3, I found it more effective to ignore the stand and use the tablet’s built-in kick stand.

How to Check If the Used iPhone You're Buying Is Stolen


If a new iPhone 6 isn't exactly in your price range, there's always the option of a used device.
Of course, there are some risks when buying a previously owned iOS device from an unofficial retailer like acquaintances or online sellers. If it's stolen, for one, the device's original owner may have Activation Lock turned on. If you don't have the Apple ID and password, tough luck — the phone's locked to that user.
Fortunately, Apple has released a new Activation Lock Status checker on iCloud.com for used buyers. All you have to do is enter the phone's serial or IMEI numbers (which can be found under the about tab in iPhones' general settings) into this form:
activation-lock
I entered my phone's serial number, which opened this screen:
phone-pic-lock
If you enter the information of a device with Activation Lock on, the tool will tell you to contact the previous owner — if you know the legitimate owner — and it provides instructions for owners on how to clear a phone for reuse. This lock feature was first introduced with iOS 7. Activation Lock automatically turns on when you use the Find My iPhone feature, which allows you to pinpoint the location of an iOS device remotely.
Note that the iCloud tool doesn't seem to be compatible with mobile Safari, so be sure to have another means to access the Activation Lock Status tool if you're meeting someone to pick up the iOS device. Otherwise, the tool is a useful way to make sure you aren't buying a useless Apple product.

Apple to Hold iPad Event Oct. 16, Report Says

According to Mashable Apple may be showing off its new iPads and iMacs sooner than expected.
The Cupertino-based company is planning to hold its next event Oct. 16, not Oct. 21 as previously reported, Recode reports.
Apple is expected to show off the next generation iPad Air and iPad Mini at the event. The upcoming iPads are said to have faster processors, likely the same A8 chip in the iPhone 6 and 6 Plus, and quite possibly Apple's Touch ID system — which first launched more than a year ago on the iPhone 5S, but has not yet shown up on an iPad.
A new line of iMacs and the launch of Apple's new operating system, OS X Yosemite, could also be on the schedule that day, according to a report from 9to5Mac earlier this week.
Apple first previewed Yosemite at WWDC in San Francisco in June and early beta versions of the operating system include references to high resolution displays.
The upcoming event will likely be more low-key than last month's U2-dominated iPhone and Apple Watch event in Cupertino's cavernous Flint Center.

Thursday, 2 October 2014

Photographer Couple Logs Travel Adventures Kiss-by-Kiss

Capturing life with your significant other can be tricky, especially if one person is always behind the lens. Photographers Kendrick Brinson and David Walter Banks are documenting their happy memories in a creative way. Whenever they travel to a new place, they photograph themselves locking lips in the same signature pose.

"David and I have so many photos of each other...but this little pose documents a tiny happy memory of a beautiful place we went and we both appear in it for a change," Brinson tells Mashable. Even professional photographers can find themselves in a vacation photo rut. 

The couple originally met at the University of Georgia where they both studied photojournalism. While the two were friends all through their college career, they didn't start dating until after graduation, and married in 2012. A year ago, the couple left their jobs at local newspapers in Atlanta to become commercial photographers in Los Angeles.

Since they're always on the go, Brinson and Banks never plan out their pose. "The camera is usually balanced on a bench or rock or trash can and then set on self-timer. We've had the foresight to use a tripod only once or twice because it's usually a spur-of-the-moment inclination," says Brinson.

The couple's amorous photo series has also inspired their Instagram followers to capture the pose themselves with the hashtag #BrinsonandBanksing. "It's so funny to think it was all a happy accident that turned into a fun little side project...As long as David's back holds out, we hope to do it until my hair is gray." 

Fans can see more photos of the couple's romantic photo op on their website or on Instagram.
  • 1. Cadillac Ranch, Amarillo, Texas

    201311_david_kendrick_pose_002
  • 2. Los Angeles, California

    201312_la_us-1
  • 3. A field in Kansas

    20100524-kansas-davidkendrickkiss
  • 4. Puerto Rico

    20111027-puertorico-davidkendrick
  • 5. Salvation Mountain in California

    20140310_brinsonbanksing_us_002
  • 6. The boardwalk, Santa Cruz, California

    20140413_brinsonbanksing_us_001
  • 7. Vancouver, Canada

    20140524_brinsonbanksing_vancouver
  • 8. Pyramid Lake, Nevada

    20140817_brinsonbanksing_pyramidlake_2

Nokia Lumia 830 available in the states from Expansys USA


The Windows Phone 8.1 powered Nokia Lumia 830 is expected to be available from AT&T, starting on November 7th. But for those statesiders that can't wait until then, an unlocked version of the handset is available right now from Expansys USA. The price for the phone is $449.99, and the device is available in black, orange, green and white.

The Nokia Lumia 830 is equipped with a 5 inch screen offering a resolution of 720 x 1280. That combination provides a pixel density of  294ppi. Driving the phone is a quad-core 1.2GHz Snapdragon 400 CPU with an Adreno 305 GPU handling graphics. 1GB of RAM is on board along with 16GB of native storage. A 128GB capacity microSD slot is available and a 10MP rear-facing camera has an aperture of f/2.2, which should allow the camera to snap decent shots in low-light conditions. And with OIS, your trembling hands don't make watching your videos a painful experience. A .9MP camera is found on the front of the phone, which is powered by a 2200mAh battery. Windows Phone 8.1 is pre-installed, which means that personal assistant Cortana comes with the model.

Eventually, the Nokia Lumia 830 will be available from AT&T for a subsidized price. But that could be more than a month away. If you don't mind paying the retail price for the phone, you can purchase it right now from Expansys USA. 

2 million iPhone 6 units already pre-ordered in China (in just 6 hours)?

While Apple will accept direct pre-orders for its latest iPhones in China only starting October 10, as of today customers can pre-order the new handsets via China Mobile, China Unicom and China Telecom (the three carriers that control the country’s mobile market).

According to Chinese website Feng, the three carriers registered 2 million iPhone pre-orders in just 6 hours. Needless to say, this is an impressive number. To put it in perspective, we’ll remind you that Apple received 4 million iPhone pre-orders in 24 hours from all 9 countries where the iPhone 6 was initially released. Of course, we must not forget that China has over 1.2 billion mobile subscribers, being by far the largest mobile market in the world. 


Apple has fierce rivals in China, including local handset makers like Xiaomi, Lenovo and Huawei, plus its global arch-rival Samsung. This, however, doesn’t seem to stop millions of customers from wanting to buy its devices. It’s well-known that extra-large smartphones are very popular in China (and South-East Asia in general), so Apple is probably more than happy regarding its decision to make both a 4.7-inch, and a 5.5-inch iPhone 6.  


Australia could have HD free to air TV from 2016


With football finals season upon us, the annual calls for the free-to-air TV broadcasters to show key matches in high definition is reaching fever pitch.
The good news is that it may potentially happen within the next few years, with Communications Minister Malcolm Turnbull claiming the forced closure of community television could free up some bandwidth for HD.
Of course, the extra bandwidth isn't guaranteed to make HD broadcasts a reality, with Turnbull quoted in The Age as stating that "In the longer term the sixth channel may be allocated for uses other than broadcasting, such as telecommunications and mobile internet."

MPEG 4 the masses

The other technological advance that could make HD broadcasts a reality is the switch from the MPEG-2 standard for broadcasting to MPEG4.
The MPEG4 standard – which was trialled during the country's brief infatuation with 3D TV – offers a much more efficient use of the available bandwidth, potentially allowing broadcasters to both switch to HD for main channels as well offering more channels.
The government is keen to encourage a transition to the MPEG4 standard for broadcasting, although any such transition would see some older televisions or set-top boxes lose the ability to receive a signal.
Most devices released in the past 10 years, including FreeView badged devices and DVRs like Fetch TV will likely be fine though.

Sony denies working on stock AOSP ROMs for Xperia devices

There have been rumors of Sony working on stock AOSP ROMs for its Xperia series of phones. This naturally excited a lot of people, as it meant you could have a stock Android experience on your Xperia device and since the ROM came from the manufacturer itself, it would mostly be stable and usable for everyday use.

Unfortunately, Sony has declined working on any such project as of now, although based on the feedback the company finds this idea "interesting", so there may be some hope in future.
It's easy to see why some people jumped to this conclusion. After all, Sony has always been open to developers working on custom ROMs for their devices, even going as far as to provide binaries and source code to help make them create their own custom ROM. However, as the company clarified in its blog post, these binaries and source code are not enough to form a complete AOSP ROM and are intended as a base for developers to reduce their work.
Hopefully, though, Sony will change its mind in future and start providing either an optional or a built-in stock or near stock version of Android for its users.

Monday, 29 September 2014

How to Fix Security Certificate Error

Instructions


    • 1
      Click on the Windows computer clock located in the notification area at the end of the desktop task bar. Click the “Change Date and Time Settings” item.
    • 2
      Click the “Date and Time” tab. Click the “Change Date and Time” button.
    • 3
      Click the correct date on the calendar that displays or use the left and right arrow keys to adjust the date. Click the time control underneath the clock display and click the hour and minute entries and type in the correct time. Click the “OK” button to save the settings.
    • 4
      Click the “Start” button on the Windows task bar and right-click “Internet Explorer” in the menu that appears. Click “Run as Administrator” in the menu that appears.
    • 5
      Type the address of the website that displays the certificate error into the address bar near the top of the Windows Internet Explorer browser window. Tap the “Enter” key to connect to the website. If the certificate error still appears, proceed to the next step.
    • 6
      Click “Continue to the website (not recommended)” in the message box that appears. Click the “Certificate Error” button.
    • 7
      Click “View Certificates” in the window that appears. Click the “Install Certificate” button. Click “Yes” to confirm that you wish to install the certificate.
    • 8
      Connect to the website through Internet Explorer to verify that the issue is resolved.

How to Repair a Corrupt WAV File


I've been up on campus talking at the PNPSummit  and in my spare time recording podcasts with interesting people. A particularly cool show that'll be coming up very soon ran pretty long, and filled up my 1 gig CF Card. I had to transfer that now "part 1" off that disk and keep recording "part 2." My editor Lawrence will then stitch the two files together and make the transition sound natural.
I uploaded the two parts and went along with my day. However, I got a call from the guys saying that the file wouldn't open and that it might be corrupt. Yikes. This has happened before, but it's usually just a transmission error. I opened the original file and....crap!
Windows Media Player
It won't open. Hm. Well, I figured that some WAV file programs are more strict than others. Perhaps I could open it in another program.
Well, shoot. It's not opening in any programs. That's not cool. I tried WAV Saver  and while I see on the net that lots of folks have had success with it, for me it crashed as I clicked repair. Apparently my file was messed up in a special way.
As I Googled around for answers and the program "GoldWave " kept coming up. It's apparently very well thought of.
When I dragged the corrupt file into GoldWave I got this friendly dialog:
File Format
This is cool because here I can get to the RAW PCM data. I just needed to tell the system what the original recording was in. Since we're on Intel, we're little endian. The recording was in stereo, at 44.1kHz and was 24-bit. Also, anything over 12-bit is usually signed. So, I'm feeling good at this point. However:
GoldWave - [mel sampat part 2 - ORIGINAL.wav]
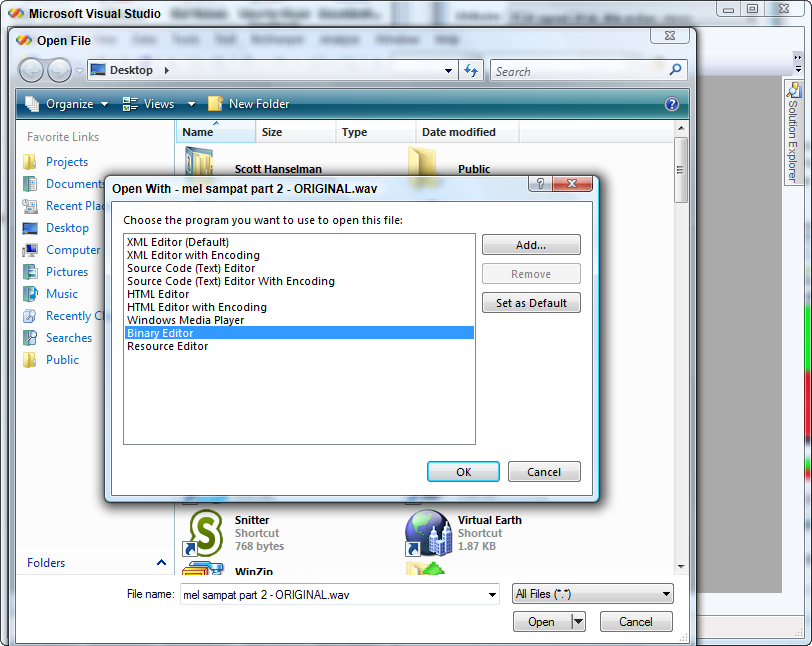
...I ended up with a screen full of white noise. Bummer. At this point, I'm getting close to giving up. Then, on a whim, I remembered that you can click the tiny down arrow next to the Open button in the Visual Studio Open File Dialog.
image
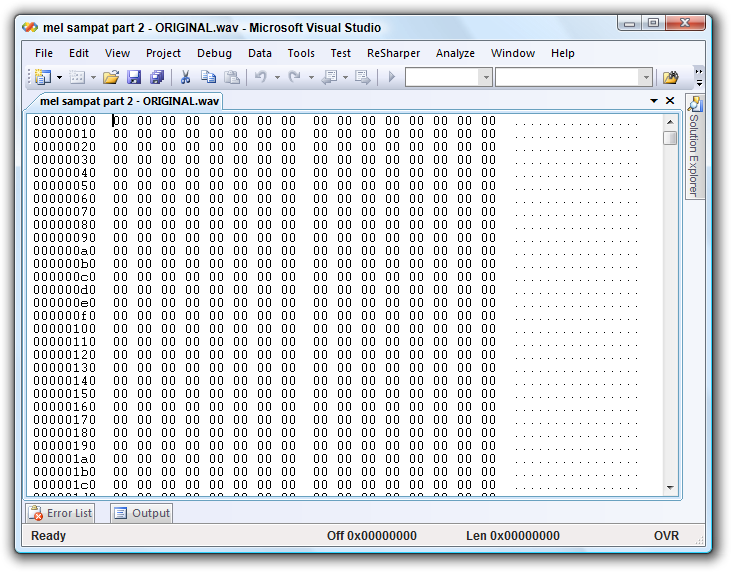
I selected Binary Editor and got this:
mel sampat part 2 - ORIGINAL.wav - Microsoft Visual Studio
Now, I'm not an expert on the WAV file format, but I understand it's just a header and some RAW PCM data. It's supposed to be pretty simple, but ALL ZEROS is simpler than even I expected. :)
So, I opened up Part 1, the valid WAV file, and looked at its header. Then I selected it on a word boundary (guessing) and copied it to the clipboard. Then I flipped over to the broken WAV and pasted in the first 48 bytes of the header of the working file, up to and including the "data" chunk .
mel sampat part 1.wav - Microsoft Visual Studio (2)
Then, I saved the file with a new name and opened it in GoldWave .
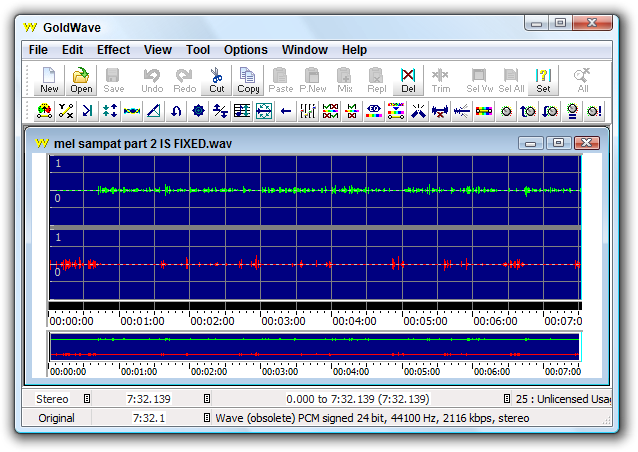
GoldWave
Amazing, it worked! Notice the correct WAV format listed in the status bar. This trick worked, because I stole the WAV Header from a file that was encoded in the identical way. It wouldn't have worked with different files. There was a small warning from GoldWave that the header's length differed from reality, but this was fixed by File|Save As with a new filename.
Miracle of miracles. I thought the show was ruined. This technique was lucky because apparently only the header was missing and I had a header available with the same format. I hope this helps someone with the same problem.

Hardware Tricks: How to Not Fix a Crashed Hard Drive


First, most tech savvy people have likely heard of the various tricks you can use to try to get data off of a failing hard drive. Put it in the freezer, knock it on the side, drop it, sacrifice a virgin keyboard under the pale LED light…. Some of those tricks might actually work on occasion, but I’m here to tell you than none of them – no, not even the keyboard sacrifice! – have worked for me in my lifetime of geekdom. But there’s one option that I have heard can work: the hard drive transplant.
I actually have a brother who successfully recovered the data off of a failed laptop drive using a transplant maybe six or seven years back. The idea is pretty simple to grasp: when a hard disk fails, there are various components that can go bad, including the power delivery system, the circuit board, the motor/bearings, and/or the drive heads. In his case, my recollection is that either the drive heads or the motor (or both) was at fault. So, you go out and buy a working drive that’s as close to identical to your failed drive as possible, and then swap some of the working pieces into the failed drive and presto: you have your data back. In my brother’s case, he got the pictures and data he was after, but he noted that the “fixed” drive was super slow – like transfer speeds of around 2-5MB/s when 20-50MB/s should have been possible. After copying the data off to another hard drive, he tossed both the donor drive and the “sort of working” drive in the trash and called himself lucky. So, it can work, but it’s by no means guaranteed.
Round 1: Fight!
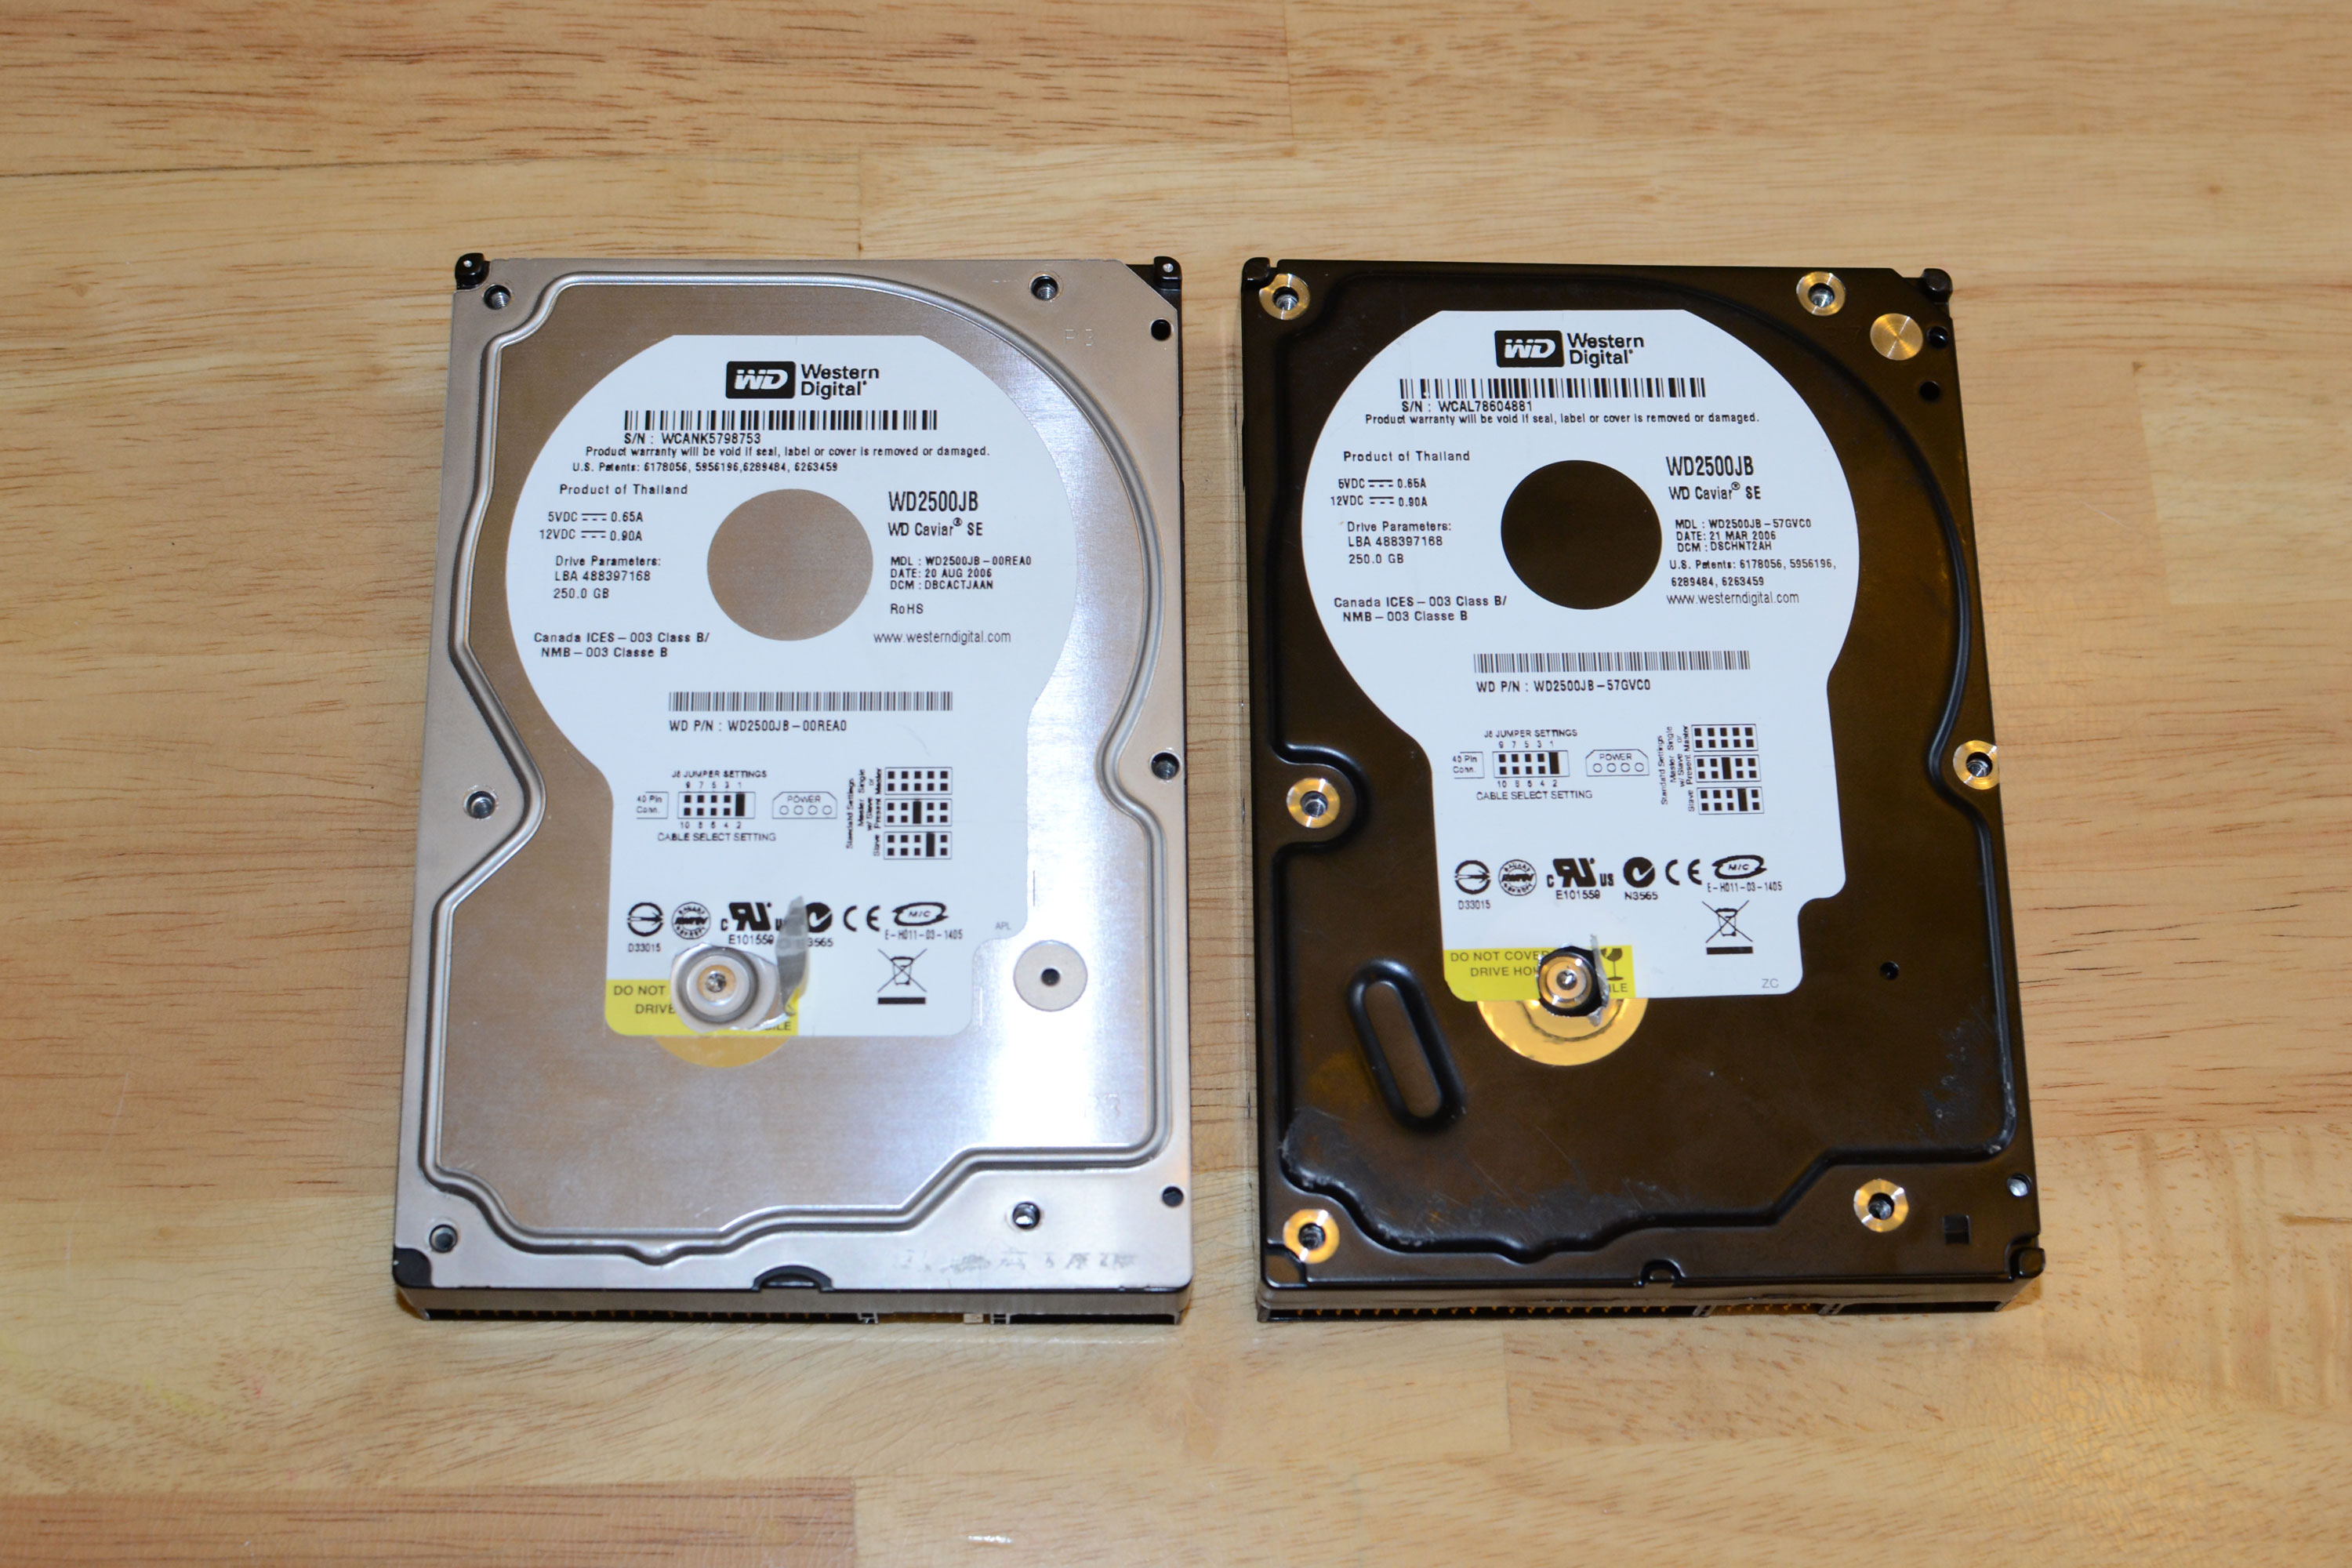
Fast forward to my latest attempts at fixing a crashed hard drive, this time from my dear old dad. He has a bunch of photos that were stored on an external HDD, a 250GB Western Digital IDE drive from 7 years ago. I confirmed the drive was dead – it spins up, clicks, sounds like it powers off for a split second, then tries again. Lather, rinse, repeat, but the drive is never recognized by the OS when connected via USB, or by the BIOS when connected directly via IDE. I went on eBay and looked up the drive model, found a potential donor drive, and ordered it. I was rash and a little too confident, unfortunately, and when the donor drive arrived I realized I hadn’t done my due diligence:
I had a new Western Digital WD2500JB Caviar SE, but this model had different firmware, a different PCB, and a silver case instead of black, and a manufacturing date that was five months later than the dead drive. But, the donor drive worked – I confirmed this in both the USB enclosure as well as with a direct IDE connection – so I decided to try doing a transplant. Here’s where things got really dumb on my part.
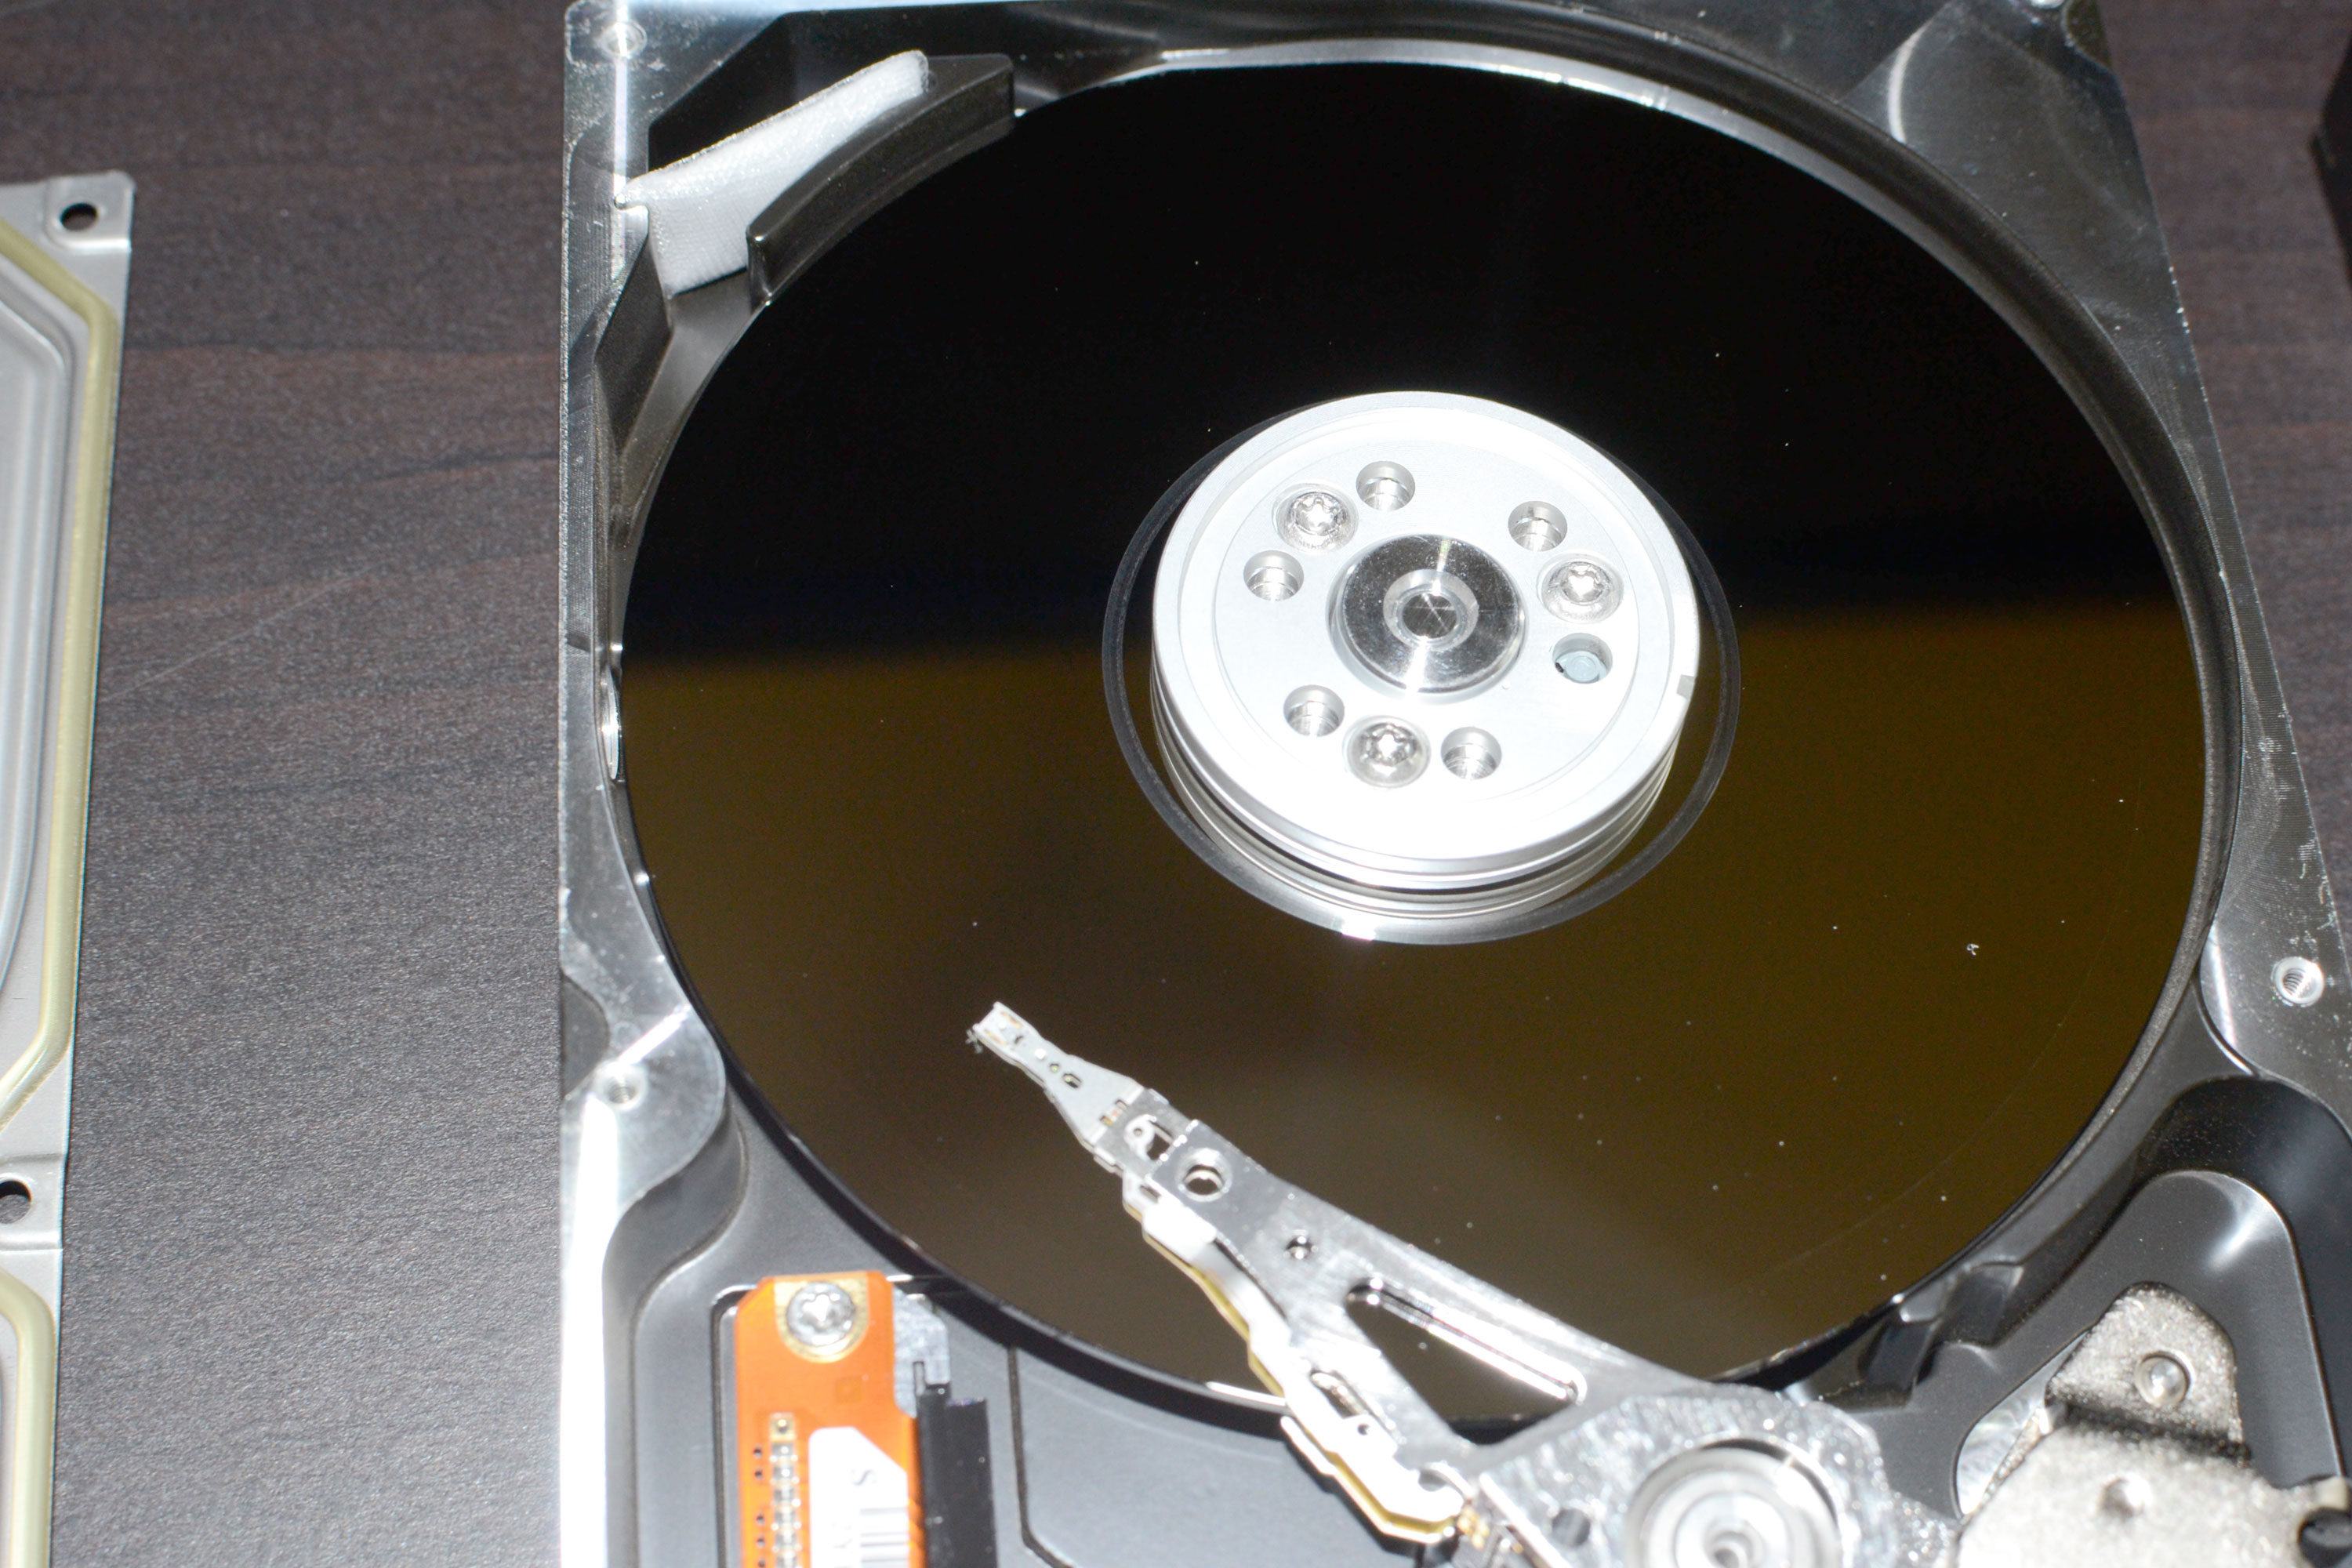
First, I should have tried swapping the system boards; if that didn’t work on the new drive, I would at least know that the firmware was incompatible. That wouldn’t put the kibosh on the transplant idea, though, as the drive heads might be compatible. Anyway, I threw caution to the wind, opened the failed drive, opened the donor, pulled everything apart – while snapping pictures of the process – and then got it all back together again. I tried to be careful, but in retrospect I was really foolhardy with my approach. Not surprisingly, the transplant failed – I tried swapping platters from the dead drive to the working drive, swapping drive heads, swapping circuit boards – basically all of the possible combinations, only not in the most logical order of progression. After the failed drive continued to emit the “click of death”, I reassembled the donor drive and found that it too was now dead and clicking. Oops.
Round 2: Use Your Head
For my next attempt, I did more research. I figured I needed to get the exact same firmware revision, and finding someone that was selling the right drive took quite a bit more time. Eventually, I did get a second drive, and after my first experience I was a little afraid to try again. I did more research, got some ideas, and finally tried again – but without so much bravado.
This time, I checked that the donor drive actually worked (it did), and then I started by swapping circuit boards. With the donor drive, I could use either circuit board and it was still fine, so at least on that level the two drives were compatible. Next, it was time to try swapping some other part to see if I could fix the failed drive. Given what I just said about circuit board swapping, that was my first attempt, and not surprisingly the original drive continued to emit a click of death on power up. Most likely it has crashed drive heads, so that was the logical next item to swap.
Having discovered that the removal and replacement of three platters can be tricky at best, I wanted to avoid doing that again, so I just needed to remove the drive head assembly from the donor and put it in the original drive. This is easier said than done. One thing I read is that the drive heads are extremely fragile, and if they touch each other they’ll usually be broken in the process. To prevent this, you need to put a little shim in between each set of heads so that when you move the actuator off the platters, the drive heads don’t snap together. I created three shims, got them into place, pried apart the strong (VERY strong!) magnets that help the actuator position correctly during operation, and carefully removed the head assembly. Except…I screwed up again!
A few other pieces of advice are in order at this point. First, I read that you don’t want to move the drive heads/actuator unless the platters are spinning in the proper direction – basically, reduce friction on the drive heads. I did my best to make sure the platters were rotating, though it’s possible this screwed up the donor head assembly before I got any further. Second, to get the head assembly out, on the WD drives you need to remove two screws that hold the top magnet in place, then pry the magnet apart (I used a flat head screwdriver), and then you also need to remove the little drive park stopper that has a smaller magnet that keeps the heads parked when the drive is powered off. Getting the magnets apart and removing the little plastic piece is a bit tricky, so again I may have damaged the heads at this stage.
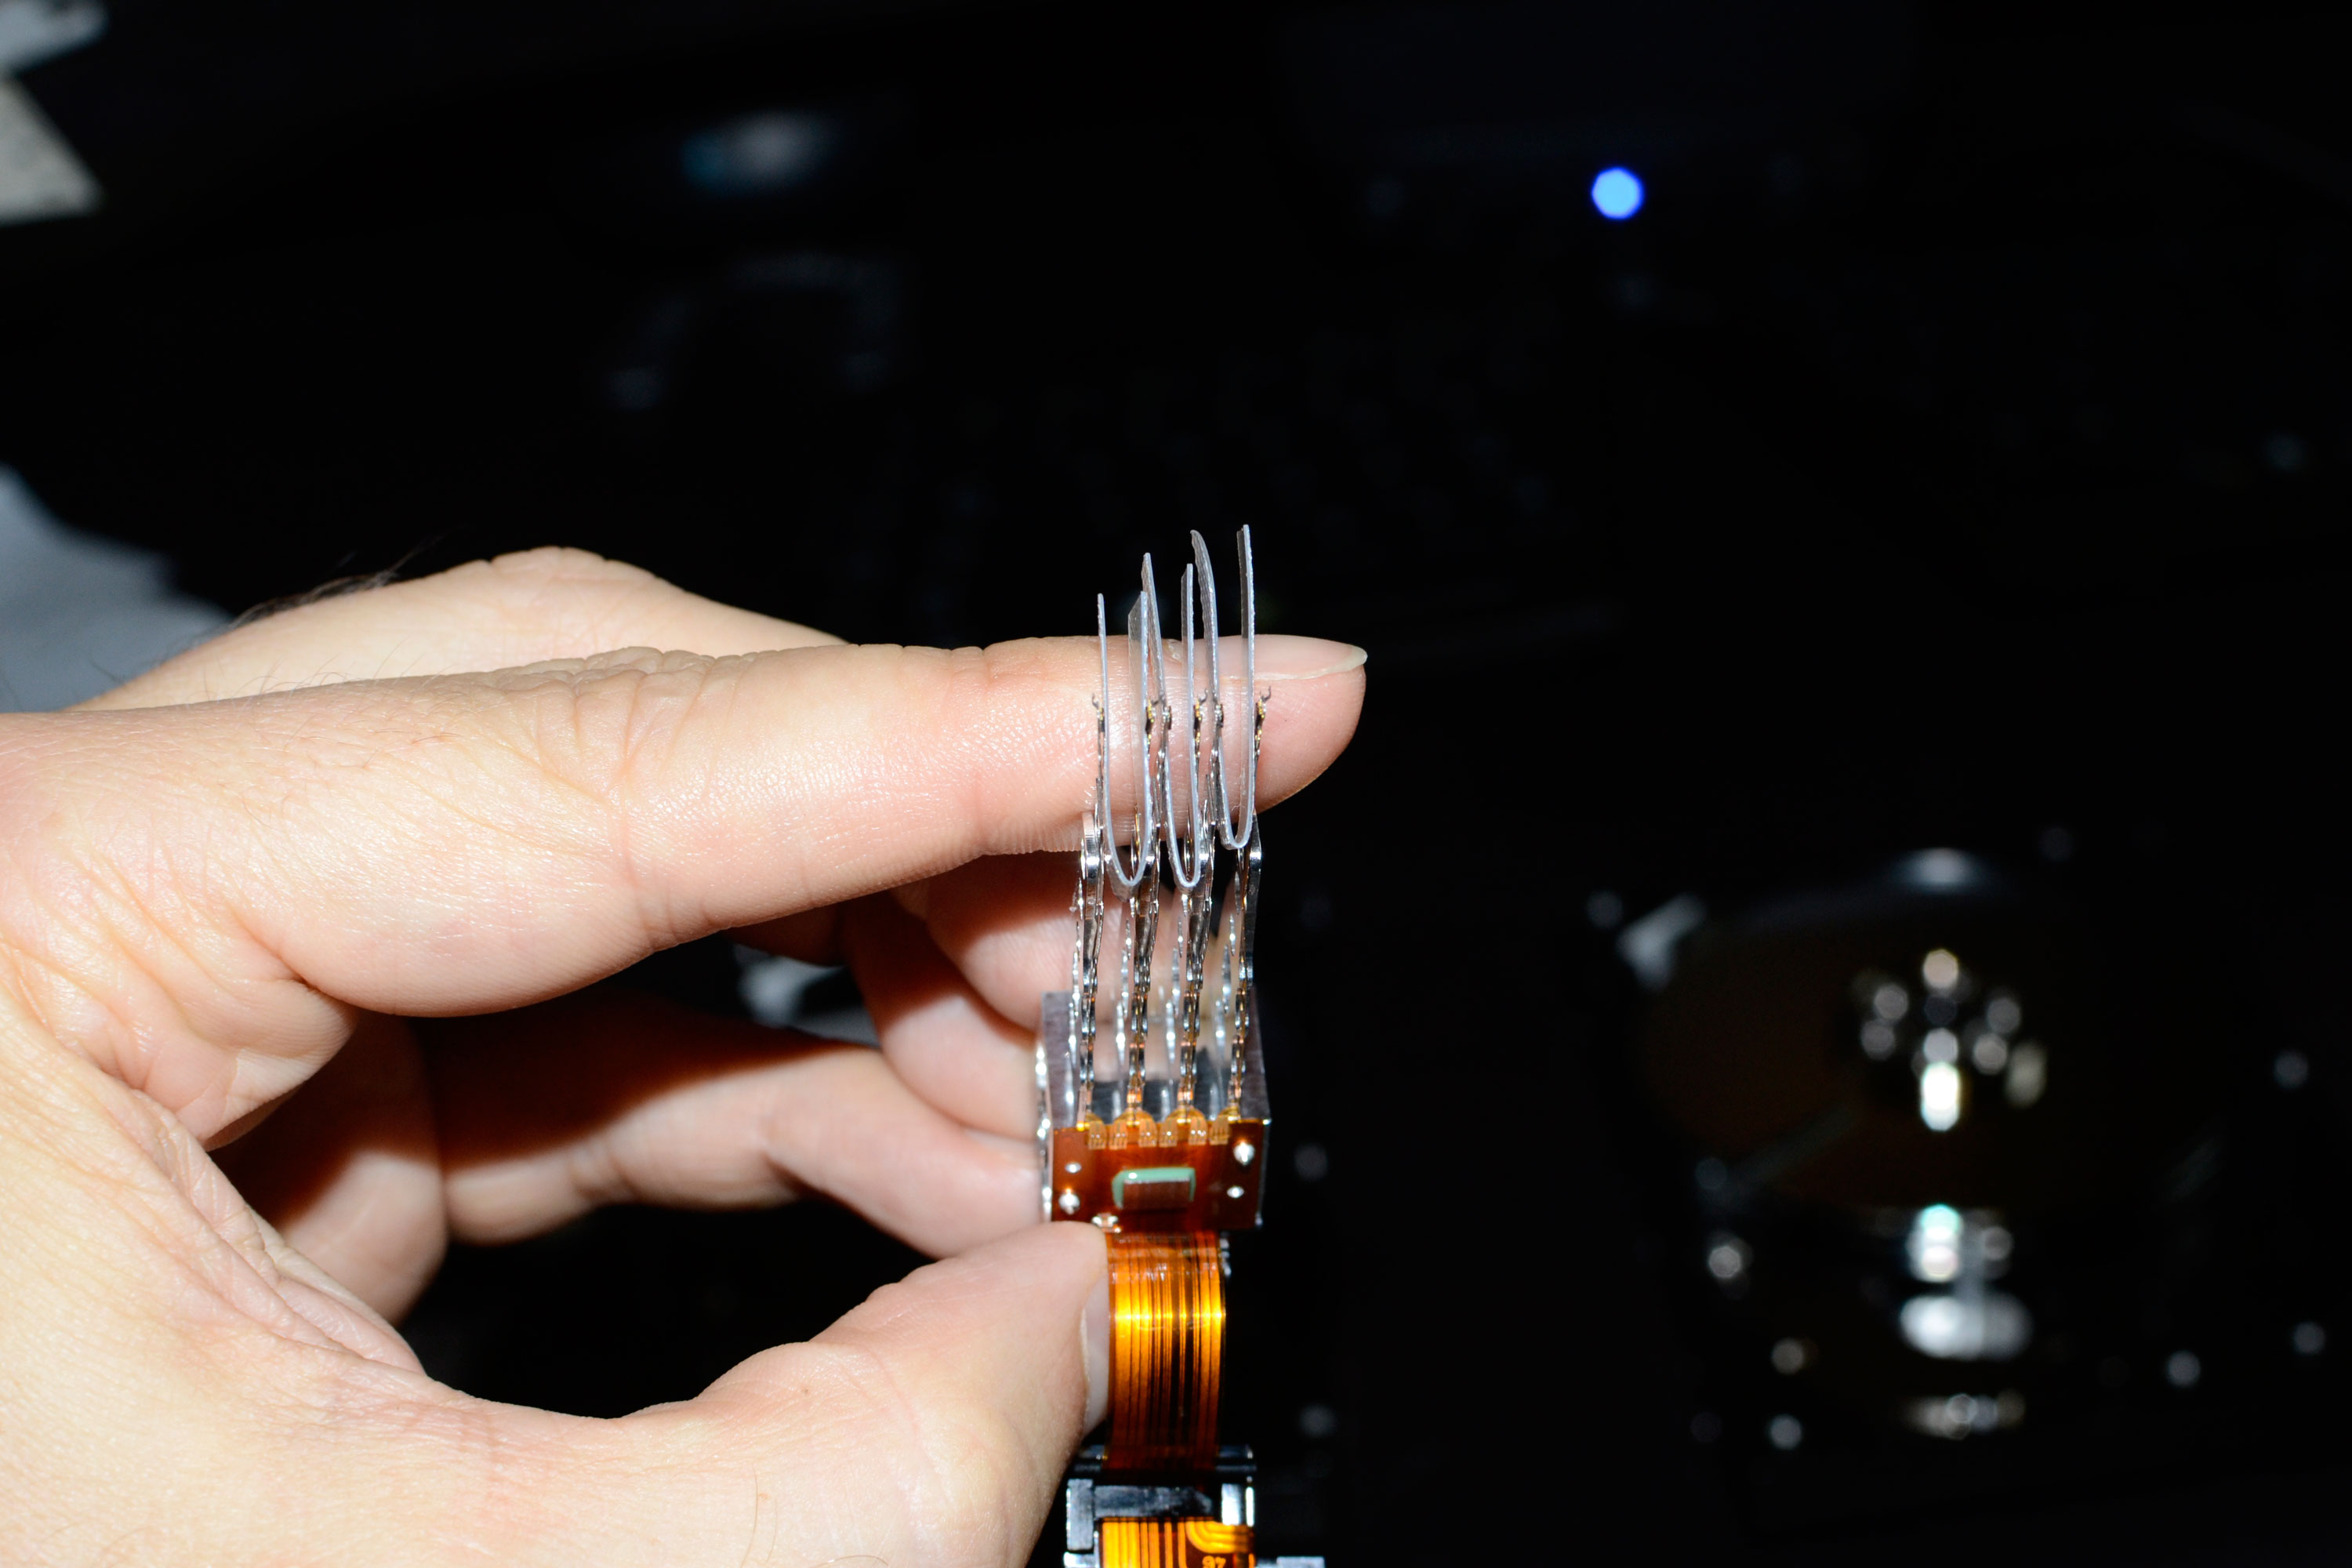
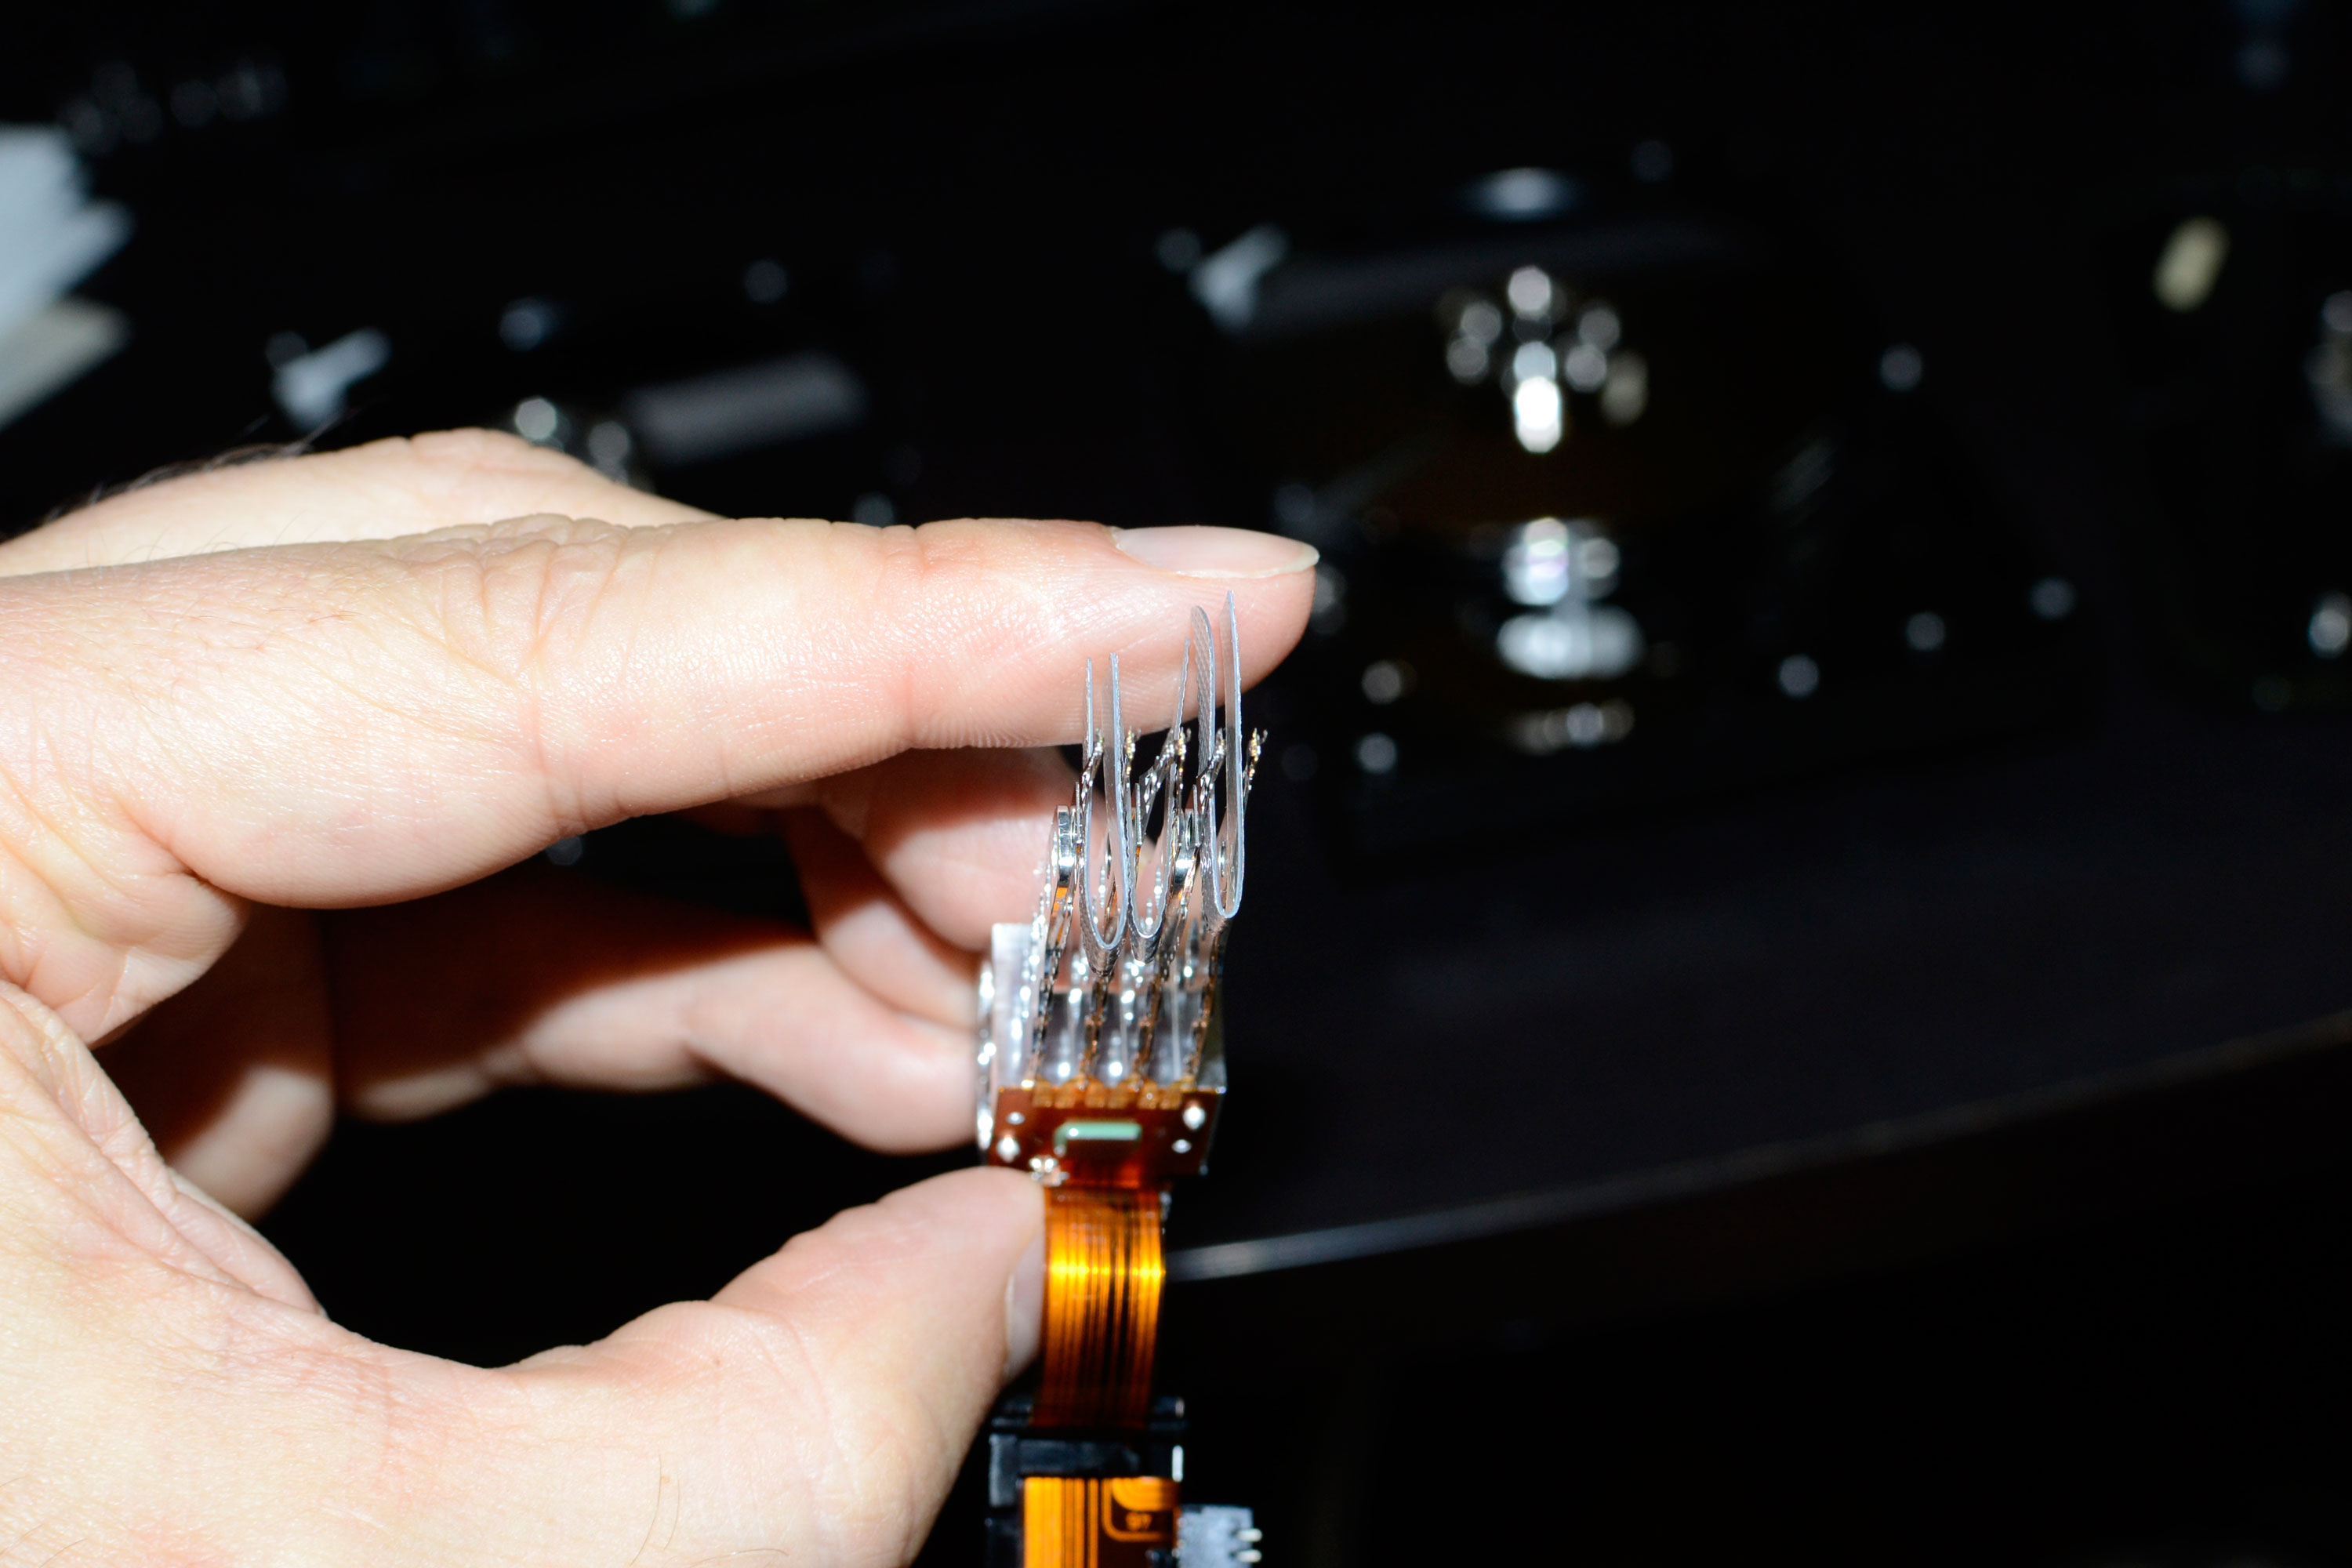
Finally, I talked about the shims, and I want to make special note of the fact that the more platters you have, the more difficult it’s going to be to get all the shims properly installed. You’ll probably make some slight scratches if you’re using homemade shims like me, but I don’t know if that’s enough to fully kill the operation (more on this below). With the top magnet removed and the shims in place, if all goes well you can move the heads off the platters and they won’t touch, and then you can remove the head assembly. It should look like this:
But remember how I said I screwed up? Well, I had the three shims in place I thought, but it turns out I missed on the middle platter so those heads connected. Uh oh. So instead of the above result this is what I had:
I put the shim in the proper position, but at this point I feared for the worst. After putting the heads into the patient drive, my fears were confirmed: more clicking to death. Except, the clicking wasn’t quite as bad, so perhaps only those middle heads are dead? Regardless, the BIOS/OS still won’t recognize the drive so the data is still lost. I also swapped the hardware back into the original donor drive and confirmed that it’s no longer working, so sure enough the drive heads are now dead. That’s my failed HDD transplant attempt #2.
Round 3: One More Try
With the previous failures under my belt, you’d hopefully think that I’d learn my lesson and move on – clearly transplanting hard drive parts isn’t my specialty. However, I have a friend that also contacted me with their own drive, and I figured I would give it one more go. This time the failed drive is a Maxtor DiamondMax Plus 9 80GB IDE drive from late 2004, but despite the age there’s a potential advantage. Where the WD2500JB has three ~83GB platters, the Maxtor has a single 80GB platter, so the transplant should be easier. I once more sourced a drive from eBay with the same firmware, and I confirmed the drive was working (note the “was”). I also swapped PCBs as my first test for compatibility and that worked fine – I formatted the drive and copied over 5GB of data, consisting mostly of larger files, and measured a transfer rate of around 15MB/s. How did we ever live with such performance?
This time, I wanted to debunk one of the oft stated rumors of the hard drive repair “professionals”: don’t open up the drive, because as soon as you do your data is as good as gone! And don’t forget the one about needing an ISO Class 5 clean room. Such claims seem a bit much, designed to get people to pay a thousand dollars to retrieve their data. Keep in mind that I’m not trying to get the drive in a permanently working condition; I just want to get it to read data for the hour or so it might require for me to copy off important files, and then the drive can hit the trash bin for all I care.
So my first step this time after doing a PCB swap (which didn’t fix the broken drive) was to open the Maxtor drive, carefully move the drive heads to the edge of the platter (while rotating the disks), and then insert my little shim. Then I pulled the drive heads off the drive (removing the top part of the magnet), and at this point I basically had the heads free and clear. Supposedly doing any of this is enough to kill the donor drive, right? After doing this, I reversed the process: put the heads back on, replace the magnet, remove the shim, return the heads to the “parked” position, close the drive back up, and connect it to my PC. A short time later and the drive is still working, at full speed even. Whew! Maybe there are some bad sectors at the edge of the disk, but at least with some impromptu testing that didn’t appear to be the case.
Having successfully moved the drive heads around and used my shim without killing the drive, it was now time to try a head transplant. I opened the donor again, opened the patient up, and guess what I found? The failed drive appears to have a ring scratched into the platter where the drive heads park. Ouch! So the heads have definitely crashed, and crashed hard – and what’s more, the scratched surface might be enough to make any transplant fail as well (as the working heads would be subject to the scratched surface as soon as you power it up). But, it’s still worth a try.
Removing the head assembly in the Maxtor is a slightly different process than on the Western Digital drives. The cover comes off the same way, but there are no screws holding the magnet in place; you just need to pry them apart. The head assembly on the other hand has two screws holding a smaller PCB in place, with a third larger screw on the pivot point of the actuator. Getting that last screw off while keeping the two drive heads “safe” is a bit trickier than on the Western Digital, as the powerful magnets can cause pieces to shift unexpectedly.
Sadly, in the process of trying to get the head assembly disconnected and out of the donor drive, I screwed up again and my little shim came out of its place, resulting in the two drive heads touching. My understanding is that the drive heads are very fragile, and I suspect there’s also an element of magnetism or something involved that can get thrown off if the heads touch. Whatever the case, after the heads touched I suspected that the resulting transplant would fail again, and I was right.
Three strikes and I’m out. I now have the original two dead drives and three others now added to my collection. Thankfully, my total cost other than time invested is at this point pretty small: $100 for the three replacement drives, and roughly ten hours of research and work on taking the drives apart and putting them back together. I’ve also tried a few combinations of hardware, but all signs indicate that I’ve damaged the drive heads on all three donors, and once damaged there’s no easy fix. Rather than investing more time and money, at this point I’m taking a break from the repairs and looking for other options.
Happily Never After?
Sadly, the Western Digital WD2500JB from my dad remains dead, as does the Maxtor MiamondMax Plus 9. At this point, I’m not sure if I want to try finding additional donors to try again, particularly with the Maxtor where the platters at the center look scratched. I’ve messed around enough that perhaps the data is at this point unrecoverable except with specialized tools. There are some tools that could help, though – like a drive head replacement tool that does the job of my ghetto shim, and does it better. Sadly, the only places I can find seem to sell them as a kit with anywhere from 20 to 100+ tools for various drive types. Obviously, most individuals only care about one tool, but finding someone that will sell a single – even for $5 – is difficult. If you really wanted to go whole hog, there are kits that have customized tools for removing the magnets, covers, etc. that run about $250, give or take. They would certainly help, particularly if you were to do this frequently, but for a single drive repair it would be a bit much.
The alternative of course is to try a data recovery company. My requirements for any recovery agency are that the cost is reasonable – $300 would be good, less is better, but up to $600 is at least worth considering. More importantly, there should be no charge unless data is successfully recovered. There are a ton of places that will attempt data recovery, but many charge exorbitant prices (sometimes more than $2000!) and most of them won’t even guarantee that they’ll be successful. I don’t need a guarantee of success, but there’s no way I’d pay $1000 or even $100 for a failure.
Just think about this: I tried three times, and while I don’t have any special tools there was at least a chance of success. I’ve dismantled and put together many a PC and laptop in my day, and I’ve only truly killed a few pieces of hardware by mistake (like the time I accidentally dropped a screw on the motherboard of a running PC and it managed to land in just the right place to short a few contacts and fry the board and CPU). Imagine if I started a data recovery company and charged even a partial $100 + hardware fee for failures! I could spend one hour trying a transplant, and if it doesn’t work I can send both the original drive and the failed donor drive back to the customer (as proof of effort) and pocket the $100 in fees, and maybe even charge a markup on the donor drive. Frankly, that would be absurd, but there are almost certainly companies that do exactly that. I’d go so far as to say paying for the failed donor drive(s) is even too much – if a company says they can recover my data, then they either succeed or they get nothing, sort of like working as a lawyer with a contingent fee: you only pay if they “win” your case. That at least gives them more incentive to do the work properly.
Then we have the FUD (Fear, Uncertainty, and Doubt) that the data recovery websites like to spread around to deter others from trying. Finding reputable sites that actually attempt a transplant and document the process is like finding the proverbial needle in the haystack, which is a big reason for why I’m writing this article. I personally know of at least two cases of people trying a drive transplant that worked enough for them to copy off their pictures and other important files; other than my above attempts, I don’t actually know of any outright failures – most people just give up and throw the dead drive in the garbage, as the $1000+ fees are more than they’re willing to pay.
One thing that I can corroborate is that doing a transplant on a hard drive is not something “simple”, and doing it without the proper tools might be a waste of time and money (and potentially render your data unrecoverable). Others might be better than I am and not make mistakes, but if I had another donor drive around I think I’ve learned enough at this point that I could be successful (assuming success is even possible). ISO certified Clean rooms are likely unnecessary for most people doing a single transplant, but at the same time your operating area should at least be clean. Even with my failures, I don’t believe for a minute some of the hyperbole thrown around about how this sort of thing should only be attempted by professionals. Just get the proper tools first, and be very careful, and I think there’s a decent chance you can do the transplant on your own. Or else fork over the hundreds of dollars to a specialist and hope for the best.
Of course, a far better solution is to set things up so that data recovery services aren’t even required. There are plenty of online backup services available, including iDrive, Mozy, SugarSync, and even DropBox. The problem is getting enough free storage to handle everything you need. I personally have over 200GB of documents, pictures, and videos that I would be sad to lose, which means if I wanted a single online backup utility I’d be looking at $80 per year or more. If I just want all my Word and Excel documents, though, it’s not that bad: less than 200MB total for all of those! But most people really don’t want to lose their digital photos, and as you can see that’s the lion’s share of the data I’d want to save (nearly 30,000 images totaling over 100GB). Local backup is of course a lot easier, and outside of the cost of a drive it’s “free”, but that doesn’t protect you from fires, theft, or other disasters, so you need to decide how important your data really is.
Wrapping this up, I don’t know for sure if it’s even possible to recover the data from these two drives at this point, but if anyone out there wants to give fixing either or both drives a go, send me an email. I might see about purchasing the tools to help do the transplant process at some point, but I’d want a good success rate before I’d consider that a worthwhile investment. (Then I could try doing the service for friends, family, etc. and recoup my costs.) But for now I’m done; like I said, if you think you can get the data off of either drive, feel free to contact me. At this point I have little to lose, and if you succeed (with reasonable pricing), I’d love to have some place I could direct our readers as well as friends/family/etc. who need such a service. On a similar note, if you have had personal success (or failure!) with a hard drive transplant, let us know in the comments; I’m sure I’m not the only one to have tried this, and it would be interesting to see how many have succeeded/failed, as well as get any other tips on how to proceed.

Feature (Middle)